9.1 KiB
Stop. This guide has been superseded by Minikube which is the recommended method of running Kubernetes on your local machine.
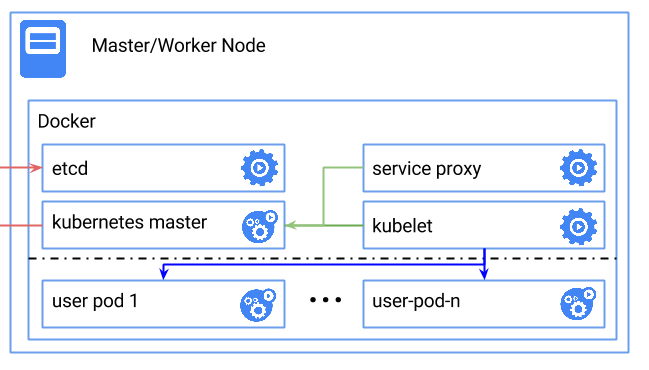
The following instructions show you how to set up a simple, single node Kubernetes cluster using Docker.
Here's a diagram of what the final result will look like:
Prerequisites
Note: These steps have not been tested with the Docker For Mac or Docker For Windows beta programs.
- You need to have Docker version >= "1.10" installed on the machine.
- Enable mount propagation. Hyperkube is running in a container which has to mount volumes for other containers, for example in case of persistent storage. The required steps depend on the init system.
In case of systemd, change MountFlags in the Docker unit file to shared.
  DOCKER_CONF=$(systemctl cat docker | head -1 | awk '{print $2}')
  sed -i.bak 's/^\(MountFlags=\).*/\1shared/' $DOCKER_CONF
  systemctl daemon-reload
  systemctl restart docker
Otherwise, manually set the mount point used by Hyperkube to be shared:
  mkdir -p /var/lib/kubelet
  mount --bind /var/lib/kubelet /var/lib/kubelet
  mount --make-shared /var/lib/kubelet
Run it
- Decide which Kubernetes version to use. Set the
${K8S_VERSION}variable to a version of Kubernetes >= "v1.2.0".
If you'd like to use the current stable version of Kubernetes, run the following:
export K8S_VERSION=$(curl -sS https://storage.googleapis.com/kubernetes-release/release/stable.txt)
and for the latest available version (including unstable releases):
export K8S_VERSION=$(curl -sS https://storage.googleapis.com/kubernetes-release/release/latest.txt)
- Start Hyperkube
export ARCH=amd64
docker run -d \
    --volume=/sys:/sys:rw \
    --volume=/var/lib/docker/:/var/lib/docker:rw \
    --volume=/var/lib/kubelet/:/var/lib/kubelet:rw,shared \
    --volume=/var/run:/var/run:rw \
    --net=host \
    --pid=host \
    --privileged \
    --name=kubelet \
    gcr.io/google_containers/hyperkube-${ARCH}:${K8S_VERSION} \
    /hyperkube kubelet \
        --hostname-override=127.0.0.1 \
        --api-servers=http://localhost:8080 \
        --config=/etc/kubernetes/manifests \
        --cluster-dns=10.0.0.10 \
        --cluster-domain=cluster.local \
        --allow-privileged --v=2
Note that
--cluster-dnsand--cluster-domainis used to deploy dns, feel free to discard them if dns is not needed.
If you would like to mount an external device as a volume, add
--volume=/dev:/devto the command above. It may however, cause some problems described in #18230
Architectures other than
amd64are experimental and sometimes unstable, but feel free to try them out! Valid values:arm,arm64andppc64le. ARM is available with Kubernetes versionv1.3.0-alpha.2and higher. ARM 64-bit and PowerPC 64 little-endian are available withv1.3.0-alpha.3and higher. Track progress on multi-arch support here
If you are behind a proxy, you need to pass the proxy setup to curl in the containers to pull the certificates. Create a .curlrc under /root folder (because the containers are running as root) with the following line:
proxy = <your_proxy_server>:<port>
This actually runs the kubelet, which in turn runs a pod that contains the other master components.
** SECURITY WARNING ** services exposed via Kubernetes using Hyperkube are available on the host node's public network interface / IP address. Because of this, this guide is not suitable for any host node/server that is directly internet accessible. Refer to #21735 for additional info.
Download kubectl
At this point you should have a running Kubernetes cluster. You can test it out
by downloading the kubectl binary for ${K8S_VERSION} (in this example: {{page.version}}.0).
Downloads:
linux/amd64: http://storage.googleapis.com/kubernetes-release/release/{{page.version}}.0/bin/linux/amd64/kubectllinux/386: http://storage.googleapis.com/kubernetes-release/release/{{page.version}}.0/bin/linux/386/kubectllinux/arm: http://storage.googleapis.com/kubernetes-release/release/{{page.version}}.0/bin/linux/arm/kubectllinux/arm64: http://storage.googleapis.com/kubernetes-release/release/{{page.version}}.0/bin/linux/arm64/kubectllinux/ppc64le: http://storage.googleapis.com/kubernetes-release/release/{{page.version}}.0/bin/linux/ppc64le/kubectlOS X/amd64: http://storage.googleapis.com/kubernetes-release/release/{{page.version}}.0/bin/darwin/amd64/kubectlOS X/386: http://storage.googleapis.com/kubernetes-release/release/{{page.version}}.0/bin/darwin/386/kubectlwindows/amd64: http://storage.googleapis.com/kubernetes-release/release/{{page.version}}.0/bin/windows/amd64/kubectl.exewindows/386: http://storage.googleapis.com/kubernetes-release/release/{{page.version}}.0/bin/windows/386/kubectl.exe
The generic download path is:
http://storage.googleapis.com/kubernetes-release/release/${K8S_VERSION}/bin/${GOOS}/${GOARCH}/${K8S_BINARY}
An example install with linux/amd64:
curl -sSL "https://storage.googleapis.com/kubernetes-release/release/{{page.version}}.0/bin/linux/amd64/kubectl" > /usr/bin/kubectl
chmod +x /usr/bin/kubectl
On OS X, to make the API server accessible locally, setup a ssh tunnel.
docker-machine ssh `docker-machine active` -N -L 8080:localhost:8080
Setting up a ssh tunnel is applicable to remote docker hosts as well.
(Optional) Create kubernetes cluster configuration:
kubectl config set-cluster test-doc --server=http://localhost:8080
kubectl config set-context test-doc --cluster=test-doc
kubectl config use-context test-doc
Test it out
List the nodes in your cluster by running:
kubectl get nodes
This should print:
NAME        STATUS    AGE
127.0.0.1   Ready     1h
Run an application
kubectl run nginx --image=nginx --port=80
Now run docker ps you should see nginx running. You may need to wait a few minutes for the image to get pulled.
Expose it as a service
kubectl expose deployment nginx --port=80
Run the following command to obtain the cluster local IP of this service we just created:
ip=$(kubectl get svc nginx --template={{.spec.clusterIP}})
echo $ip
{% endraw %}```

Hit the webserver with this IP:

```shell{% raw %}

curl $ip
{% endraw %}```

On OS X, since docker is running inside a VM, run the following command instead:

```shell
docker-machine ssh `docker-machine active` curl $ip
Deploy a DNS
Read documentation for manually deploying a DNS for instructions.
Turning down your cluster
- Delete the nginx service and deployment:
If you plan on re-creating your nginx deployment and service you will need to clean it up.
kubectl delete service,deployments nginx
- Delete all the containers including the kubelet:
docker rm -f kubelet
docker rm -f `docker ps | grep k8s | awk '{print $1}'`
- Cleanup the filesystem:
On OS X, first ssh into the docker VM:
docker-machine ssh `docker-machine active`
grep /var/lib/kubelet /proc/mounts | awk '{print $2}' | sudo xargs -n1 umount
sudo rm -rf /var/lib/kubelet
Troubleshooting
Node is in NotReady state
If you see your node as NotReady it's possible that your OS does not have memcg enabled.
- Your kernel should support memory accounting. Ensure that the following configs are turned on in your linux kernel:
CONFIG_RESOURCE_COUNTERS=y
CONFIG_MEMCG=y
- Enable the memory accounting in the kernel, at boot, as command line parameters as follows:
GRUB_CMDLINE_LINUX="cgroup_enable=memory=1"
NOTE: The above is specifically for GRUB2. You can check the command line parameters passed to your kernel by looking at the output of /proc/cmdline:
$ cat /proc/cmdline
BOOT_IMAGE=/boot/vmlinuz-3.18.4-aufs root=/dev/sda5 ro cgroup_enable=memory=1
Support Level
| IaaS Provider | Config. Mgmt | OS | Networking | Conforms | Support Level |
|---|---|---|---|---|---|
| Docker Single Node | custom | N/A | local | Project (@brendandburns) |
Further reading
Please see the Kubernetes docs for more details on administering and using a Kubernetes cluster.