6.8 KiB
Pipeline Parallel
Author: Guangyang Lu, Hongxin Liu, Yongbin Li
Prerequisite
Example Code
Related Paper
- Colossal-AI: A Unified Deep Learning System For Large-Scale Parallel Training
- Efficient Large-Scale Language Model Training on GPU Clusters Using Megatron-LM
- GPipe: Efficient Training of Giant Neural Networks using Pipeline Parallelism
Quick introduction
In this tutorial, you will learn how to use pipeline parallel. In Colossal-AI, we use 1F1B pipeline, introduced by Nvidia. In this case, ViT and Imagenet are too large to use. Therefore, here we use ResNet and Cifar as example.
Table Of Content
In this tutorial we will cover:
- Introduction of 1F1B pipeline.
- Usage of non-interleaved and interleaved schedule.
- Training ResNet with pipeline.
Introduction of 1F1B pipeline
First of all, we will introduce you GPipe for your better understanding.

As you can see, for GPipe, only when the forward passes of all microbatches in a batch finish, the backward passes would be executed.
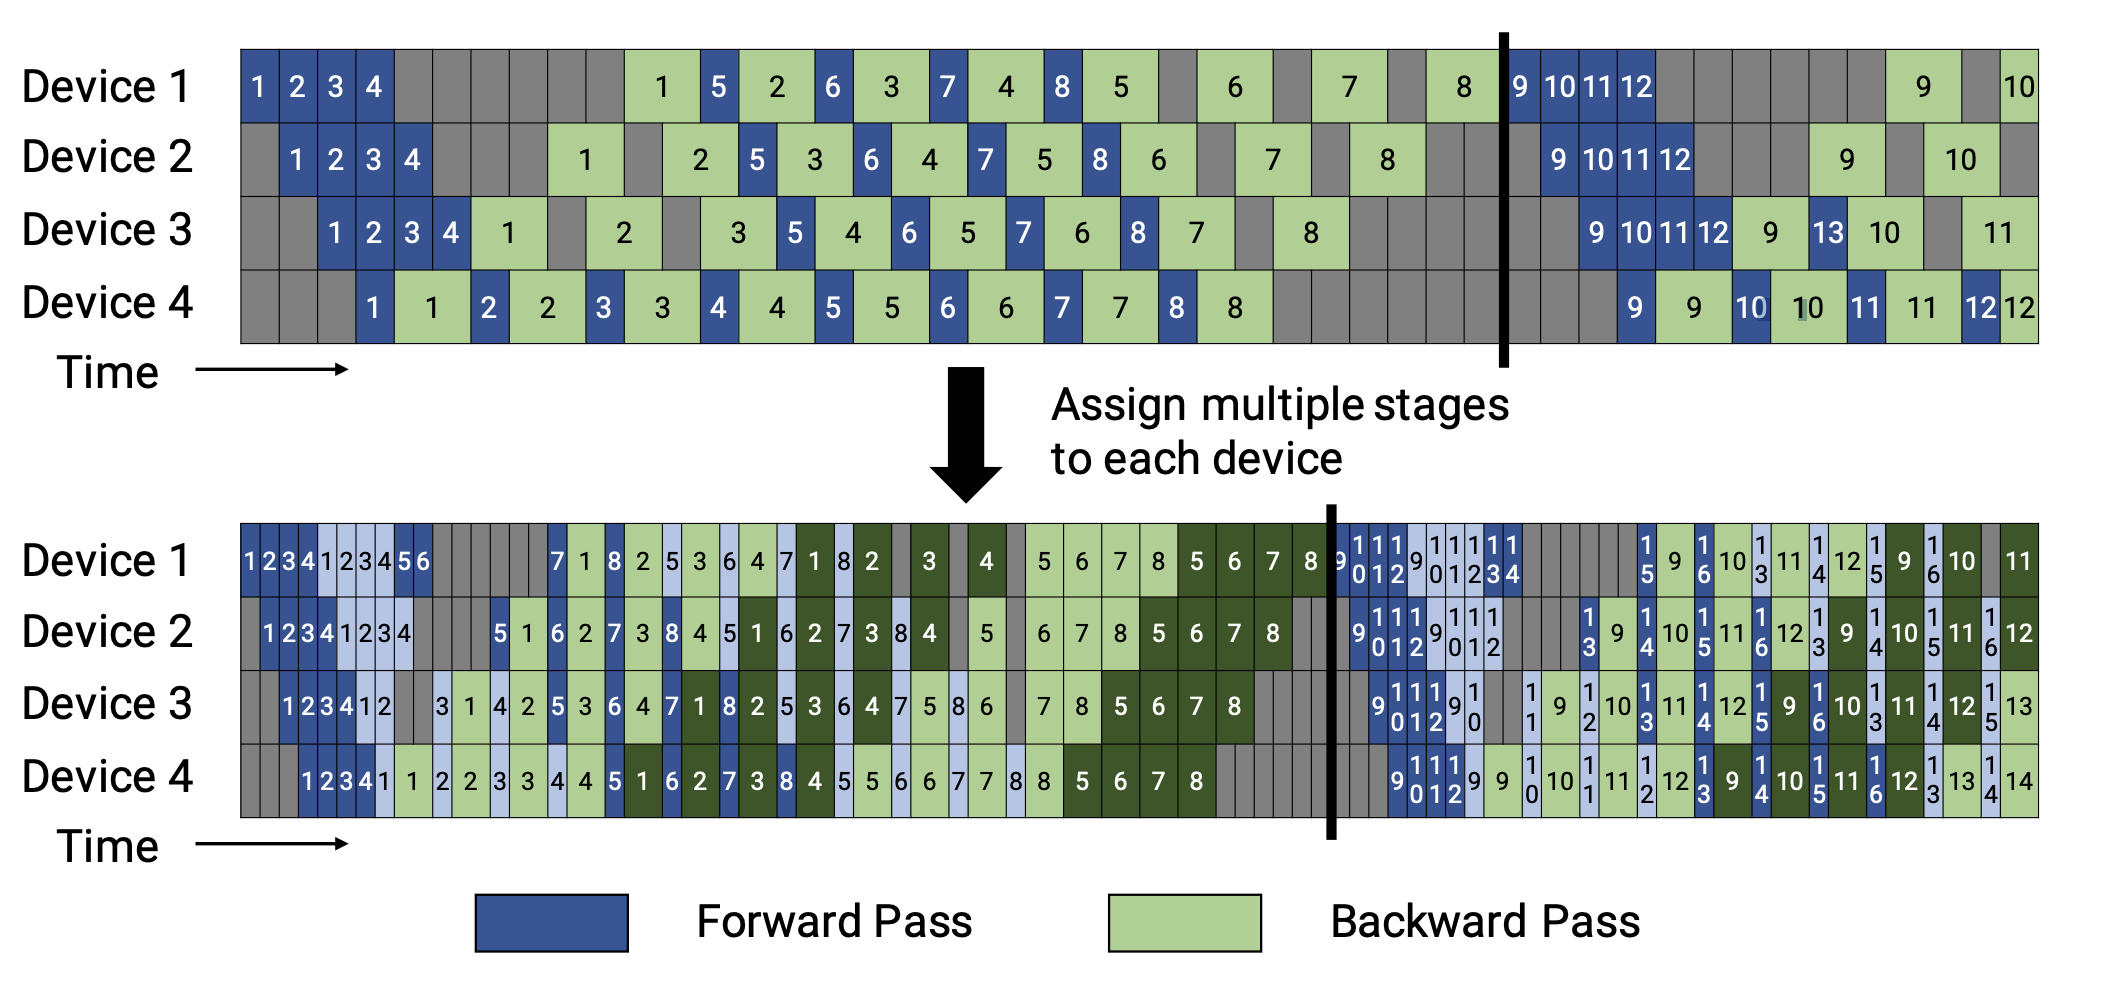
In general, 1F1B(one forward pass followed by one backward pass) is more efficient than GPipe(in memory or both memory and time). There are two schedules of 1F1B pipeline, the non-interleaved and the interleaved. The figures are shown below.

Non-interleaved Schedule
The non-interleaved schedule can be divided into three stages. The first stage is the warm-up stage, where workers perform differing numbers of forward passes. At the following stage, workers perform one forward pass followed by one backward pass. Workers will finish backward passes at the last stage.
This mode is more memory-efficient than GPipe. However, it would take the same time to finish a turn of passes as GPipe.
Interleaved Schedule
This schedule requires the number of microbatches to be an integer multiple of the stage of pipeline.
In this schedule, each device can perform computation for multiple subsets of layers(called a model chunk) instead of a single contiguous set of layers. i.e. Before device 1 had layer 1-4; device 2 had layer 5-8; and so on. But now device 1 has layer 1,2,9,10; device 2 has layer 3,4,11,12; and so on. With this scheme, each device in the pipeline is assigned multiple pipeline stages and each pipeline stage has less computation.
This mode is both memory-efficient and time-efficient.
Usage of non-interleaved and interleaved schedule
In Colossal-AI, we provided both non-interleaved(as PipelineSchedule) and interleaved schedule(as InterleavedPipelineSchedule).
You just need to set NUM_MICRO_BATCHES in config file and set NUM_CHUNKS in config file if you want to use Interleaved Pipeline Schedule. If you certainly know the shape of each pipeline stage's output tensor and the shapes are all the same, you can set TENSOR_SHAPE in config file to further reduce communication. Otherwise, you can just ignore tensor_shape, and the shape will be exchanged over pipeline stages automatically. Then we will generate an appropriate schedule for you.
Training ResNet with pipeline
Let's build the ResNet model first with Colossal PipelinableContext:
import os
from typing import Callable, List, Optional, Type, Union
import torch
import torch.nn as nn
import colossalai
import colossalai.nn as col_nn

from colossalai.core import global_context as gpc
from colossalai.logging import disable_existing_loggers, get_dist_logger
from colossalai.trainer import Trainer, hooks
from colossalai.utils import MultiTimer, get_dataloader
from colossalai.context import ParallelMode
from colossalai.pipeline.pipelinable import PipelinableContext

from titans.dataloader.cifar10 import build_cifar
from torchvision.models import resnet50
from torchvision.models.resnet import BasicBlock, Bottleneck, conv1x1

# Define some config
BATCH_SIZE = 64
NUM_EPOCHS = 2
NUM_CHUNKS = 1
CONFIG = dict(NUM_MICRO_BATCHES=4, parallel=dict(pipeline=2))

# Train
disable_existing_loggers()
parser = colossalai.get_default_parser()
args = parser.parse_args()
colossalai.launch_from_torch(backend=args.backend, config=CONFIG)
logger = get_dist_logger()
pipelinable = PipelinableContext()

# build model
with pipelinable:
    model = resnet50()
Define an execution sequence.
exec_seq = [
    'conv1', 'bn1', 'relu', 'maxpool', 'layer1', 'layer2', 'layer3', 'layer4', 'avgpool',
    (lambda x: torch.flatten(x, 1), "behind"), 'fc'
]
pipelinable.to_layer_list(exec_seq)
Partition the model into pipeline.
model = pipelinable.partition(NUM_CHUNKS, gpc.pipeline_parallel_size, gpc.get_local_rank(ParallelMode.PIPELINE))
In this tutorial, we use Trainer to train ResNet:
# build criterion
criterion = nn.CrossEntropyLoss()

# optimizer
optimizer = torch.optim.Adam(model.parameters(), lr=1e-3)

# build dataloader
root = os.environ.get('DATA', './data')
train_dataloader, test_dataloader = build_cifar(BATCH_SIZE, root, padding=4, crop=32, resize=32)

lr_scheduler = col_nn.lr_scheduler.LinearWarmupLR(optimizer, NUM_EPOCHS, warmup_steps=1)
engine, train_dataloader, test_dataloader, lr_scheduler = colossalai.initialize(model, optimizer, criterion,
                                                                                train_dataloader, test_dataloader,
                                                                                lr_scheduler)
timer = MultiTimer()

trainer = Trainer(engine=engine, timer=timer, logger=logger)

hook_list = [
    hooks.LossHook(),
    hooks.AccuracyHook(col_nn.metric.Accuracy()),
    hooks.LogMetricByEpochHook(logger),
    hooks.LRSchedulerHook(lr_scheduler, by_epoch=True)
]

trainer.fit(train_dataloader=train_dataloader,
            epochs=NUM_EPOCHS,
            test_dataloader=test_dataloader,
            test_interval=1,
            hooks=hook_list,
            display_progress=True)
We use 2 pipeline stages and the batch will be splitted into 4 micro batches.